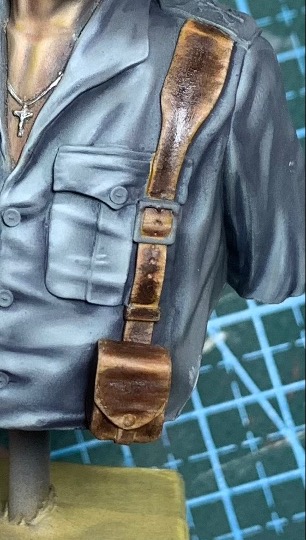
Para la pintura de accesorios de cuero desgastados como cinturones, cartucheras y otros, divido el proceso en 3 pasos principales: pintura base, texturizado del desgaste, tono final según el tipo de piel con óleos (marrón, negro, etc) y perfilado.
En este caso, las fotos corresponden con unas cinchas del ejército español de principio del siglo XX, realizadas en cuero curtido negro. Los colores se usados se pueden variar para conseguir otro tonos de cuero.
Paso 1: Pintura base
En este caso utilicé el amarillo ocre de Shmicke y lo apliqué en todo el cuero, sin preocuparme en este momento por la iluminación o desgaste final.

Paso 2: texturizado del desgaste
Antes de aplicar el tono final del cuero, será necesario aplicar la textura de desgaste que queramos dar al cuero. Para ello, utilicé el color cuero rojo de Vallejo, aplicado con pequeñas rayas desde el centro hacia afuera de las cinchas, dejando a la vista el color ocre en los bordes y en aquellas zonas en las que queramos simular más desgaste. Es importante que sean rayas irregulares.
En este punto deberemos conseguir el esquema general de desgaste y un tono sobre el que aplicar los colores del último paso con óleos, aprovechando la transparencia de éstos para conseguir un efecto final realista.

Paso3: color final – óleos – perfilado
Para este ejemplo usé 3 colores en dos aplicaciones. La primera fase es con un mezcla de burnt sienna y raw sienna, que nos da un tono de piel marrón oscuro. Aplico la pintura desde el centro y las zonas más oscuras del cuero y se difumina hacia los bordes y zonas de más desgaste. Este efecto teñirá todo el cuero pero dejando ver la textura previa. Es importante el no aplicar mucha pintura de una vez e ir poco a poco para no ocultar del todo el paso previo.

Si queremos un cuero negro, como en este caso, repetimos el paso anterior añadiendo negro a la mezcla anterior, aplicándolo en las misma zonas pero reduciendo algo la cantidad de pintura y difuminando el efecto según nuestras preferencias.

Teniendo ya el tono final que nos interese, el último paso es el perfilado de los bordes, primero con un color arena o beige para resaltar el desgaste en las zonas más expuestas (es importante que la pintura del paso previo esté seca y aplicarlo en pequeñas rayas sin exagerar este efecto) y luego en la línea de separación del cuero con la camisa, para obtener un resultado más limpio y definido.
